Thursday, December 12, 2013

There's already been a change of plans for the holiday to-do list. Gary's parents think our sub-floor isn't going to be smooth enough to take the paper bag flooring... so I guess I'll have to live with the purple carpet a little while longer.

Instead, I'm going to focus in on the laundry room and a couple of small things in the bedroom. There's tons to do and it will definitely take the entire holiday. Here's what I'm hoping to accomplish:

Laundry Room (Budget: $150)
  1. Take down the shelving on the exterior wall. Losing storage you ask?!?! Crazy as it sounds, right now the extra wire shelving just makes the room look crowded and cluttered. 
  2. Paint the walls and the floor (Mint walls, white and navy stripped floor).
  3. Find wall cabinets at the Restore to hang above the washer and dryer, paint them navy.
  4. Find a small rug. 
  5. Taking down the shelving means I have to find some alternative storage for my pajamas, towels, Gary's shoes, and a few other things.
  6. Build a shelf cover to hid Gary's wire shelf. Spray paint the rod hooks navy, cover the rod in pretty contact paper.
  7. Build a shelf to rest on top of the washer and dryer.
  8. Spray paint the metal detergent navy.
  9. Get pretty baskets and jars for detergent, socks, undies, etc.
That's A LOT to do on $150! Let's see if I can make it happen!!!

Bed Room -- (Budget: As cheap as possible.)
  1. Get paint to match current color; patch holes and do touch ups.
  2. Find curtain rods and curtains (going to be EXPENSIVE because I need ten panels).
  3. Get a new shower curtain.
  4. Move blue dresser down stairs and paint dark blue or red.
  5. Start looking for cool side tables, mirror, wall art, pillow shams, etc. I want the room to have a really eclectic look so I'll be slowly finding unique pieces at the Goodwill, yard sales, and thrift shops.
I'm getting started this weekend!! I'm excited and I can't wait to blog about my progress!

-K


Friday, December 6, 2013

So I made four posts, then went on an eight month hiatus. Since April, I've done a couple of little projects in the kitchen that I'll photograph soon and get posted. I've redone the upstairs bathroom. I've made some incredible Craig's List and Goodwill finds that I'll photograph and share if I can ever get some good photographs. Right now all I have is my phone and I just can't get any good pictures. I've also done two wedding showers that had some great DIY decorations. I'll share those eventually too... :)

I'm off for three weeks at Christmas and I have some major plans.

Here's my impossible to do list:
Brown paper floor DIY in the living room
Find a way to refresh the hard wood floors of the front room, kitchen, and dining rooms
Pick paint colors for bedroom and laundry room
Frequent the Restore to find cabinets for the laundry room
Get curtains made for the bedroom
Finish third curtain for the kitchen

WOW! That doesn't even include my dreams of actually painting the bedroom and the laundry room OR working on turning one of the upstairs extra bedrooms in a dream closet.

I plan to sort out some pinterest boards to seperate things I like from things I actually want to do around here!

Wednesday, April 10, 2013

Eat, Drink and be Merry!

My (nearly) finished dining room!


 I still need to style the china cabinet and find a centerpiece for the table. I have some ideas for what I want, but I need the time to assemble the pieces.


 So... here's run down on what's in the room:
  • Dining room set: Craigslist
  • My curtains were my major purchase for the space. I needed two rods and six panels! Garden ridge has some great curtains at low prices. I got these gold faux silk panels for just $15 each. They still cost me $90, but it's half the price of what I would have paid at Target or Bed, Bath, and Beyond.


  • I bought the vintage flower art Goodwill for just $5! The vintage gold frames were also a Goodwill find and were $6 each (I plan on changing out the artwork soon). The vintage map of the US and the bronze antelope figures are estate sale finds from a few years ago. My paper-mache gazelle head was an impulse purchase at Garden Ridge, but I LOVE it!!!


  • I moved the chevron rug from the living room into the dining room to pull everything together. Its a little small but still really anchors the table and I like the modern mixed with the vintage accessories. I bought the rug several months ago at www.RugsUSA.com. They have incredible sales...This rug is regular price about $400, but I only paid $100 with free shipping! I was nervous ordering a rug online, but it's really great quality and I'm really pleased. 


Like I said, I still need to do some finishing touches, but I was just so excited to share the space with everyone. I'll post photos as I go!

xx
-kelly


Sunday, April 7, 2013

Dining Chair Update

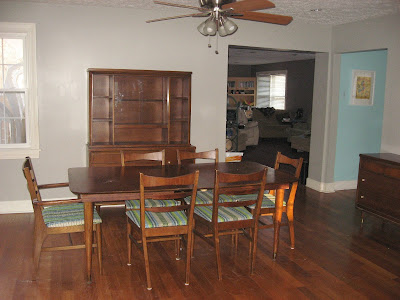
My dining room furniture is a great mid-century style set from the 1960s, but the fabric on the seats was old, worn, and not my style.

Changing out the fabric of your dining chairs is an easy and inexpensive way to give yourself a whole new look. There's already a million tutorials on the internet about how to change out the fabric, so rather than post a whole new how-to, I found a link to this great guide on HGTV.com.

Here's my chairs before and after...


Because the old cushions were as flat as pancakes, I'm also adding in a new layer of foam padding to make the seats more comfortable. To do this, I just bought a big roll of 1" foam at Hobby Lobby and traced the shape of the chairs onto it with a marker. I cut it out and just layered it between the fabric and the wooden seat base.

Lesson #3: Never pay full price at Hobby Lobby. There is always a 40% off any item coupon on their website that you can print from home. If you have a smart phone, you can also pull it up on their website or download their app. You can use a new coupon everyday. Gary and I pulled up the coupon on our phones, went through the line as two separate transactions, and BAM, 40% off our purchase of fabric and foam!

Lesson #4: When you buy fabric for any upholstery project, think about the way it's going to look when cut and shaped to your piece of furniture. The fabric I selected was actually my second choice. I really adored the Hobby Lobby fabric used on this bench project from DIY blog, Inspired Again, but to get the circular pattern to look right on my chairs it would have doubled my yardage (expensive)!! So in the end, Gary and I agreed on the dark gray and yellow because I could cut the pieces in any direction (minimizing yardage needed). We also liked that it was dark and will hopefully hide dirt and stains a little better.


Normally, recovering chair seats is an easy task, but it's taking me forever because there are so many layers of old fabric to remove and my poor hands can only take pulling out so many old upholster tacks at one time!! I should be done by the end of the week though!


Fresh Start in the Dining Room

I've spent the past couple of week working on the dining room and I'm about ready to share the new look with everyone.

I didn't take any before images, but I looked around on Facebook and found these two old pictures of the dining room.  You can get a sense of the color and decor.


The black, laminate, 80s pedestal table with metal chairs and a broken down bench were the only furniture. Gary had a few pieces of coordinating wall art that weren't bad, but they reminded me of off the shelf, room-in-a-box type things that I had in my first apartment. He did have two great pieces of original artwork bought in Amsterdam that will be finding a new home in the hallway.

My goal was to bring a more modern style into the room. Here's my fresh start...  


The color is Woodlawn Colonial Gray by Valspar. It's such a clean palette and feels so open. My dining set is a great Craigslist find. It didn't come easy though, I browsed and searched practically everyday for weeks for the right pieces. I finally found this is incredible mid-century modern table, six chairs, China cabinet, and buffet for just $300!!!

I'm really excited to show everyone the finished product later this week...just trying to finish recovering the chairs so I can photograph the entire room.

(and you can see a sliver of the over-the-top aqua in the living room I mentioned earlier in the first photo...)

Sunday, March 24, 2013

Color Palette Central

My first decorating challenge was selecting a new color palette for painting the house. The open floor plan of our home essentially unites the kitchen, dining room, and TV room into one large space with the adjacent living room flowing into the mix as well.


Old color palette, painted about seven years ago.

I spent weeks agonizing over paint colors. I have more than 100 color cards in a drawer. Every shade of blue, teal, green, yellow, gray, and brown that you could imagine. I was literally in color overload. I wanted each room to have it's own feel, but still united in a common look and a smooth flow.

I knew I loved the color teal so I found found a beautiful shade of aqua and jumped on it for the living room. In my head, I was going to figure out the flow later. I loved this shade of paint so how could it be wrong?


On the walls, it's bright. REALLY bright. I still think the color is lovely, but it just wasn't working in the living room. It feels so young, energetic, and casual. All good things...but I wanted cozy and inviting in my living room. Plus, how on earth was I going to find three more paint colors to pull in for the palette for the rest of the house?

So, Lesson #1 (learned the hard way): When decorating an open floor plan, think about the overall color scheme first. A color you love can go all wrong when it doesn't work with the surrounding decor.

So, with one room already in need of a repaint, I set out to find the perfect color pallet that could tie all of the rooms together. After weeks of deliberating, driving Gary crazy, countless trips to Lowe's and Sherwin Williams, and multiple color sample blotches painted all over the house, I finally ended up with a palette I love. My current color choices are balanced and will flow seamlessly through the open floor plan.

Lesson #2: Use the custom mixed color testing samples you can get for just a few dollars at your paint store. I tested two additional teals in the dining room and one in the kitchen before ruling them out. I'm so glad I saved myself the time, money, and sorrow of additional repaints by testing the colors on my walls first.

Color palette I'm implementing right now in the house. I haven't yet picked the tv room color, but I won't be painting there for several months...and I know that it will be an additional gray neutral based off Woodlawn.

I can't wait to get all the painting finished up so I can share what the walls are looking like these days. I've got the kitchen and dining room painted and I'll post about those once I can get decent images.  I'll also share, room by room, how I made my color decisions.

You can also check out my Pinterest board on COLOR PALETTES to see some of the things I considered and read up on some real expert advice on selecting a cohesive color theme.

xx,
-kelly